Showing posts with label test bed. Show all posts

Thursday, August 22, 2019

8/22/19 Report - One Nice Find. Ultimate Test Bed. Mystery Object Definitely Identified. Florida Beaches and A Wave.


Written by the TreasureGuide for the exclusive use of treasurebeachesreport.blogspot.com.

Gold Nugget Detected by Richard W.
Photo by Richard W.

Richard W. said, Since you’re doing some testing with the Equinox I thought you might enjoy looking at this small gold nugget I found last week on a mountain in Colorado with my Equinox 800. For size comparison I placed it on my watch for the photo. It really has some detail. I used factory settings, Gold 1 and sensitivity at 22. It rang up at 2 to 4 on target display. Hope to make it again next year to Wabasso for another hunt up and down the coast from there.

Richard W.
Woodland Park, Colorado

Thanks Richard.  Congratulations on a nice find!

---

Here are some tips from Sebastian Steve.

…  I built this first rate "Test Bed" a couple years ago, to finally have an accurate place to test and tune metal detectors.  


Simple rows of holes 4' between each row and each hole.  It is IMPERATIVE to clean out each and every metal target in the entire test bed area before even beginning.  The last thing you need is a big nail at 6" helping your dime reading, or giving you a funky double header!  Go over the ground again and again, I had 87 pieces of small metal, mostly rusted nails, but some non ferrous as well (tin clippings from the soffits, etc.)  


Holes are accurately dug as each plug was dug with a post hole digger, then a paint stick laid over the center of the top of the hole, with a tape measure going straight down the middle. Very accurate depth determination.  Then the soil at the bottom is packed and depth re-verified.  Only then is a 6" plastic disc (cut from old tupperware or the like that lunch meat comes in) laid carefully flat in the bottom.  The coin is then placed on this.  Depth now finalized... within 1/4" but always to the deeper side it not spot on.  Now we know that with the plastic disc, that the coin will 1. no longer work down deeper, and 2., the coin will not tilt.  Tilt was my main concern.  The hole is carefully filled and packed solid.  Be prepared to have some extra dirt to pack each hole fill and tight.  Then only rain and time will be needed for that all natural feel.  Granted...coins will react will and influence the soil around them, but my system gives good exposure to the surrounding soil/sands.


I have holes for an 8" and a 10" penny, same nickel, same dime, quarter is 8", 10", 12", and 14,"  These are all clad.  Anything less than 8" deep is not worth the challenge in the "Test Bed."  Then I have a 8" silver dime, and a 8" and 10" deep lead Minie'Balls.  For kicks...a brass house key at 8"  I planted a Civil War 10 pound projectile at 3.5 ft., right before heading north this summer.  This allowed me to practice on these types of deep, large targets as well.  (Note:  This was the ONLY target the Minelab Equinox with the 6" coil could NOT detect).  


___A well constructed and accurate "Test Bed" is an invaluable asset if you are serious about detecting.___  Allowing you to really know how your machine reacts to different depths and targets.  So many different ways to tune a machine.  Which is best, which combination?   What does the rain really do?  So many errors and malfunctions that a quick run past the "Test Bed" will quickly expose before heading out.  For example a failing coil or weak batteries, or corroded connector, or not tight, that may still "look" good on the meter.


The most alarming but MOST VALUABLE experiment you will learn, is that most any metal detector when subjected to a very deep coin, even silver, will read as if the coin were -rusty iron-.  Can you say GRUNT?  Every time, time and again.  That is one of the main issues I want to explore with a new or different machine.  A proper "Test Bed" will soon humble even the most experienced detectorist...just as soon as you see a silver quarter grunt like some old rusty metal when over a foot deep!  It is heartbreaking when you think..."Oh my Gosh... I wonder how many, a hundred or more signals like this, I --WALKED RIGHT ON PAST--.  Makes you think and slow down.  (:


Good Hunting,


Sebastian Steve

Thanks Steve!

---

John E.'s mystery object is now nailed down.  Mitch K. and Steve M. found the item on the internet for sale.  Here it is.

  • It is a 4 way battery post and terminal cleaner. It is a durable aluminum alloy construction, hardened and tempered springs steel post cleaners
  • 4 Way Battery Post Cleaner is designed to give leverage when cleaning battery Post and Terminals.
  • Help to removes heavy stubborn corrosion build-up on battery posts and terminals for improved electrical contact.
  • Designed to give leverage when cleaning battery post and terminals

Thanks guys!

---

Here is a little news from Brian M. on beach conditions north of the Treasure Coast.

I detect Daytona area and we are sanded in bad.  About 4 or 5 weeks ago we had about 4 or 5 feet of sand pile on the beach..

 
... the last few weeks have been real hard to find much of anything.  I went yesterday and detected a large grid in front of a nice hotel. Spent four hours hunting . I did almost the whole  hotel beach area and found two pull tabs and two bottle caps. I was thinking that maybe below the Cape may not be as sanded in . (due to the north flow.)  I have been as far north as Flagler Beach and it’s the same. We need some big surf.

Thanks for sharing Brain.  It has been a long summer of poor beach conditions.
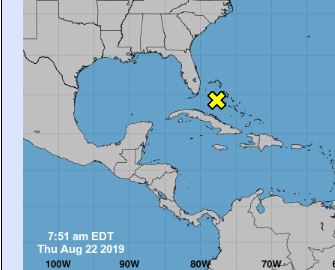

\
Source: nhc.noaa.gov

From the nhc.noaa.gov:

1. A trough of low pressure located over the central and northwestern
Bahamas is producing disorganized showers and thunderstorms.  Some
slow development is possible by this weekend or early next week
while the system moves northwestward toward the Florida peninsula at
5 to 10 mph and then turns northeastward off the southeastern coast
of the United States.
* Formation chance through 48 hours...low...near 0 percent.
* Formation chance through 5 days...low...20 percent.
Happy hunting,
TreasureGuide

Friday, November 23, 2018

11/23/18 Report (Part 1) Creating Your Own Test Bed. Treasure Hunting: A Way of Life.


Written by the TreasureGuide for the exclusive use of treasurebeachesreport.blogspot.com.

Source: MagicSeaWeed.com.
According to the latest MagicSeaWeed.com predictions, the peak surf for the Treasure Coast has been delayed a day or so, now expected to occur on Saturday rather than Friday, as predicted earlier.

We've had a couple days of north wind, but not much surf.  The tides are pretty big though.

I'll get out to check the beaches before long.

---

Sebastian Steve offered the following tips for creating your own metal detecting test bed.


I had to do a Minelab Equinox new design coil (15” elliptical) review vs. the EQX stock 11” coil in my Test Bed.
   

To verify my results, and put credibility on my results,  I explained what a proper Test Bed entails.  Surely a big job done properly...but if you are a serious detectorist, it will pay grand dividends over time...


First off - to trust my data means you need to know something about my test bed. I've made many over the years, but never a proper planned development. If you do "hodge-podge" in your backyard, you end up with wondering "Now how deep was this nickel yet, or was this the dime location"??? I think we've all been there! After the embarrassment of actually -losing- a test bed coin...due to placing it too close to the edge of the concrete and getting re-bar masking, I decided to do it right.  A "proper" Test Bed was laid out on the computer geometrically, in simple neat rows, 4' apart rows, and 4' side to side on each target hole.  


But most important... a -record- of your work on computer, phone app, even a simple piece of paper...just to remember your layout later on. Your biggest time consuming work with be de-masking the entire field. That is removing every last piece of unwanted metal, ferrous and non ferrous...  nails, nail heads, soffet tin scraps, screws, and if you're lucky...even a coin or two from the de-masking. Unfortunately I was not so lucky.  

By demasking...I of course mean removing all scrap iron and junk for a 98% iron free test bed that will be free of the effects of -iron masking-. Just as important is the opposite. You leave a piece of iron in the ground inadvertently, and it ends up right next to one of your holes. Now the real target is -amplified- and not a true reading on its own!  So if you can get through the iron removal process... probably several hours, (I had 84 pieces no bigger than a nail), you are well on your way to a test bed to be proud of.

I should take a minute to point out the great value and utility of a well built test bed (Test garden's are for tomatoes). That checking how deep your machine will read a particular target is the least of it. 


One...you may find out something is not right on your machine when you cannot hit an easy target....loose connector, bad coil, etc. 


Then you have the different modes, which really does work well in your soil? And when we get to -tuning- now we really benefit! So many possibilities! 


Wow...it works better and deeper -with- discrimination on!!?? Really??? Things like that. And then of course comparing one machine to another. 


And of course if your buddy's are good to you and bring the beer... well they too could use your test bed. I have personally enjoyed quite of bit of training others in my test bed. The uses are many and varied...and well worth the effort to construct a quality test bed that if done right, will last decades!

Here is how... and I'm going to keep this brief. Any questions, just please ask. 

1. Keep the test bed a minimum of 15' from any structure to avoid EMI and building materials near the structure. Of course a shady spot is always preferred. Watch out for U/G septic tanks, wiring, heavy plumping, etc.

2. You can decide on your own depths, but for me the minimum necessary was 8". 

3. Use a post hole digger if you have it, or your detecting shovel to keep tight, small holes. The less the side-walls are disturbed the better.

4. This is important...place a round plastic disc (from an old Tupperware, etc.) the exact width of the hole in the bottom of the hole by hand, carefully leveling off and pushing down into firm ground. This will keep the coin from sinking deeper into the ground, or worse yet, tilting off on its side.

5. Keep taking this disc in and out until you get the perfect depth to within a half inch or less. But always on the + depth to keep minimums. To measure accurately...carefully lay a paint stick on the ground across the center of the opening of the hole. Press flat and level with the overall lay of the land. Now measure straight down with a tape ruler, crossing the paint stick at right angles. You -will- get excellent depth control!

6. Place your coins logically. I started on the far left hole, 1st row with an 8" penny, then a 10" penny, then an 8" nickel, 10" nickel, 8" dime, 10." dime, 8" quarter, 10" quarter, 12" quarter, and 14" quarter. So you can stand there and easily count out to where you want to be.

7. And simply make your rows 4' apart, and the holes no closer than 4' from each other.  Deciding on the length of rows is up to you.

8, I intend soon to add another 2 rows for the half dollar, $1 coin, etc. And even a row for the Civil War Minie' Balls buried at different test depths!


All the Best,

Sebastian Steve 

---

I hope you had a great Thanksgiving.


I took my mother and family out to eat.  Amazing!  America is doing well -  at least a big part of it.

The meal was fit for a king - turkey, steak, ham and sides and deserts galore.

As if the meal and fellowship wasn't treasure enough, I found a ten dollar bill on the floor.  Treasure hunting isn't just for the beach.  It seems to be a full-time thing for me - a way of being.  It is about being alert and enjoying the surprises that pop up in front of you.  You can do it anywhere and anytime.

I looked around to see if I could see anyone who lost the bill but couldn't, so I ended up keeping it.  I checked the serial number to see if it was worth more than ten dollars, and it wasn't.

I've enjoyed treasure hunting since my earliest remembrance of going out to see if I could find if the chicken laid any new eggs.  We had one that nested on the ledge of the garage window.  I remember finding an egg and putting it in my pocket.  I must have been about five or something.  The egg broke in my pocket and made a real mess.  

I also enjoyed going out to find wild strawberries in the field on the hill.

Glad I was a country boy.

With the Thanksgiving celebration yesterday, as with everyday, there was a gift far above and beyond those I've already mentioned.  It is the amazing mystery of life and awareness itself, which provides the field and makes all the other things which appear within it possible. 

Some people try to make it about nothing but molecules and evolving green slime, but they can't explain awareness, let alone tell you what it is.  Some might say that it has to do with brain activity, but there is a huge leap from chemical and electrical activity to awareness. 

Where did it all come from?  The big bang?  You must be kidding!   What created the big bang?  The big bang answers nothing.  It just adds another question.  What about Occams Razor?  

People can give thanks for all kinds of things, but for me the most amazing mystery and gift is life itself and awareness.  Everything else occurs within the field of awareness, like ornaments on a Christmas tree.

Yes, there are problems too.  Pain and suffering.  Broken bulbs and lights that don't work.  But they get swallowed up.  They don't last forever.  And they fade in the light of eternity.

Accept your gift of Life and give thanks.

Happy Hunting,
TreasureGuide@comcast.net